C++ Syntax
참고
Input
cin, cout 입출력속도 향상
1
2
3
4
5
6
7
8
9
10
11
12
13
14
15
16
17
int main() {
    ios::sync_with_stdio(false);
    cin.tie(NULL);

    /* 또는 */

    ios::sync_with_stdio(0);
    cin.tie(0);
}

/*

주의 : 위 코드 사용시 printf(), scanf() 사용 금지

endl 절대 사용 금지 -> 출력 속도 낮아짐.

*/
char, string 타입 입력받기
1
2
3
4
5
6
7
string str;

cin >> str

cin.get(str,길이)

getline(cin,str)
- 주의 사항
>>연산자는 공백 전까지만 출력함.- cin은
'\n'을 변수에 담지 않고 입력 버퍼에 저장함. - getline은 변수에
'\n'을 담음.
2번과 3번에 따라, cin 다음 getline을 동시에 사용하는 경우 cin으로 값을 입력하면, 버퍼에 '\n'이 남아있으므로 그 다음 getline으로 입력 받을 시 입력이 안될 것임.
- 따라서 cin 사용 후
cin.ignore함수를 사용해야 함. cin.ignore(32767, '\n');
무한 입력
1
2
3
4
int n;
while(cin >> n) {
    /* code */
}
Output
소수점 출력하기
1
2
cout << fixed; // 원하는 자리수만큼 출력
cout.precision(n); // n자리 만큼 소수점 출력
변수
초기화
1
2
3
4
5
int x(5); // 직접 초기화

int x = 5; // 복사초기화

int x {5}; // 유니폼 초기화
복사 초기화 및 직접 초기화는 일부 타입의 변수에 대해서만 작동함.
모든 데이터 타입에서 작동하는 단일 초기화 메커니즘을 제공하기 위해 C++ 11은 유니폼 초기화라는 새로운 형태의 초기화 메커니즘을 추가함.
유니폼 초기화는 형 변환을 허용하지 않음.
1
2
3
int x{5};
int x{} -> x = 0
int x{4.5} -> compile error
참조형 변수
- C++은 3가지의 참조형 변수를 지원한다고 함.
- non-const 값 참조형
- const 값 참조형
- r-value 참조형
- const 값 참조형
참조형은 인수의 값을 수정하려는 경우나 인수의 비싼 복사본을 만들지 않으려는 경우 함수 매개변수로 자주 사용됨.
1
2
3
4
5
6
7
/* Reference to non-const values */

int value = 5;
int& ref = value;

value = 6; -> ref = 6
ref = 7; ->  value = 7
참조형은 반드시 선언과 동시에 초기화 해줘야 함.
포인터는 null 값으로 초기화 할 수 있지만, 참조형은 불가능.
또한, non-const 변수를 참조하고자 하면, non-const 변수로 초기화해야 함.
const 값이나 r-value 값으로 초기화 할 수 없음.
1
2
3
4
const int y = 7;
int& ref2 = y;  -> ERROR, y는 const value임.

int& ref3 = 6; -> ERROR, r-value로 초기화 불가능.
const 참조의 경우는 non-const 참조와 다름.
const 참조는 non-const 값, const 값 및 r-value로 초기화할 수 있음.
- 단, const 이므로 값을 변경하는 것은 불가능함.
- 따라서 상수 참조라고 부름.
1
2
3
4
5
6
7
int value = 5;
const int& ref = value;

const int y = 7;
const int& ref2 = y;

const int& ref3 = 6;
참조형 변수는 한 번 초기화하면 다른 변수를 참조하도록 변경할 수 없음.
1
2
3
4
5
int v1=5
int v2=6

int& r=v1 -> r = 5
int& r=v2 -> ERROR
auto
auto 키워드는 선언된 변수의 초기화 식을 사용하여 해당 형식을 추론하도록 컴파일러에 지시함.
즉, auto 키워드를 사용하면 초깃값의 형식에 맞춰 선언하는 인스턴스(변수)의 형식이 자동으로 결정됨.
이것을 타입 추론(type inference)이라고 함.
auto 키워드를 사용한 변수는 반드시 초기화를 해줘야 함.
초기화를 하지 않고 사용한 변수는 사용 불가함.
- 따라서 auto 키워드는 함수의 매개변수에 사용할 수 없음.
- 컴파일 시 컴파일러가 추론할 수 없기 때문임.
- 하지만, 함수의 리턴형에 auto를 사용하는 것은 가능함.
- 좋아 보일 수 있지만 잘못 해석할 가능성도 있어서 추천x. (C++14부터)
동적 메모리 할당
1
2
3
4
5
6
7
8
9
10
11
12
13
int *ptr1 = new int (5);
int *ptr2 = new int { 6 };

int num;
cin >> num;
int *ptr3 = new int[num]; /* new operator for array */

delete ptr1;
delete ptr2;
delete[] ptr3; /* delete operator for array */
ptr1=0;
ptr2=0;
ptr3=0;
메모리 누수를 방지하기 위해 메모리가 할당된 포인터에 다른 주소값을 넣기 전에는 반드시 delete로 해제한 뒤에 사용해야 함.
범위 기반 for 문
python의 for i in 과 비슷함.
1
2
3
for(DataType var : array) {
    statement;
}
DataType은 배열의 데이터타입과 동일해야 함.
따라서 auto 키워드를 이용하는 방법이 이상적임.
또한 배열의 요소를 복사하는 것으로, 비용이 많이 든다면 참조 연산자를 이용할 수 있음.
1
2
3
4
5
6
7
8
9
10
11
12
13
14
15
16
17
18
19
20
21
22
// example

#include <iostream>
using namespace std;
int main()
{
    int fibonacci[] = { 0, 1, 1, 2, 3, 5, 8, 13, 21, 34, 55, 89 };

    for (int number : fibonacci)
    {
        cout << number << ' ';
    }

    /*
    for (auto &number : fibonacci)
    {
        cout << number << ' ';
    }
    */

    return 0;
}
- 단, 포인터로 변환된 배열에서 범위 기반 for 루프를 사용할 수 없음.
- 배열의 크기를 알지 못하기 때문임.
마찬가지로 동적배열 또한 사용 불가능함.
1
2
3
4
5
6
7
int sumArray(int array[])
{
    int sum = 0;
    for (const auto& number : array) // -> ERROR
        sum += number;
    return sum;
}
Class
Class 생성자
1
2
3
4
5
6
7
8
9
10
11
12
13
14
15
16
17
18
19
20
21
22
23
24
25
26
27
28
29
30
31
32
33
34
35
36
37
38
39
40
41
42
43
44
45
46
47
48
49
50
51
52
53
54
// example
#include <iostream>
using namespace std;

class Wall {
  private:
    double length;
    double height;

  public:
    // 기본 생성자
    Wall() {
      length = 5.5;
      cout << "Creating a wall." << endl;
      cout << "Length = " << length << endl;
    }

    // 매개변수가 있는 생성자
    Wall(double len, double hgt) {
      length = len;
      height = hgt;
    }

    // copy constructor with a Wall object as parameter
    // 객체를 매개변수로 받는 복사 생성자
    Wall(Wall &obj) {
      length = obj.length;
      height = obj.height;
    }

    double calculateArea() {
      return length * height;
    }

    ~Wall() {
        cout << "destructor" << '\n';
    }
};

int main() {
    Wall wall1;

    // create an object of Wall class
    Wall wall2(10.5, 8.6);

    // copy contents of wall1 to wall2
    Wall wall3 = wall2;

    // print areas of wall1 and wall2
    cout << "Area of Wall 2: " << wall1.calculateArea() << endl;
    cout << "Area of Wall 3: " << wall2.calculateArea();

    return 0;
}
1
2
3
4
Creating a wall.
Length = 5.5
Area of Wall 2 : 90.3
Area of Wall 3 : 90.3
Class 생성자 초기화 리스트
1
className() : var1(value), var2(value), ..., varN(value) {}
1
2
3
4
5
6
7
8
9
10
11
12
13
14
15
// example
class Something {
    private :
      int var1 = 10;
      char var2 = 'a';
      // int var3 (10) -> 멤버 초기화 시 직접 초기화 방식으로 불가능.

    public :
      Something(int value1, char value2='c') : var1(value1), var2(value2) {}
      Something(int value1, char value2='c') : var1{value1}, var2{value2} {} // C++11부터

int main() {
    Something A(10,'b'); // 직접 초기화
    Something B{5,'c'}; // 유니폼 초기화
}
- 기본 값이 있더라도 초기화 리스트가 우선시 됨.
- 즉, var1=10 -> value1, var2=’a’ -> value2
생성자 위임
1
2
3
4
5
6
7
8
Circle::Circle() {
	radius = 1;
    std::cout << "반지름 " << radius << " 원 생성" << std::endl;
}
Circle::Circle(int r) {
	radius = r;
    std::cout << "반지름 : << radius << " 원생성" << std::endl;
}
생성자 위임이란 생성자에서 다른 생성자를 호출하는 것을 말함.
생성자 위임을 통해 중복되는 코드를 제거할 수 있음.
1
2
3
4
5
6
Circle::Circle() : Circle(1) {} // Circle(int r)의 생성자 호출, 위임 생성자

Circle::Circle(int r) { //타겟 생성자
	radius = r;
    std::cout << "반지름 " << radius << " 원 생성" << std::endl;
}
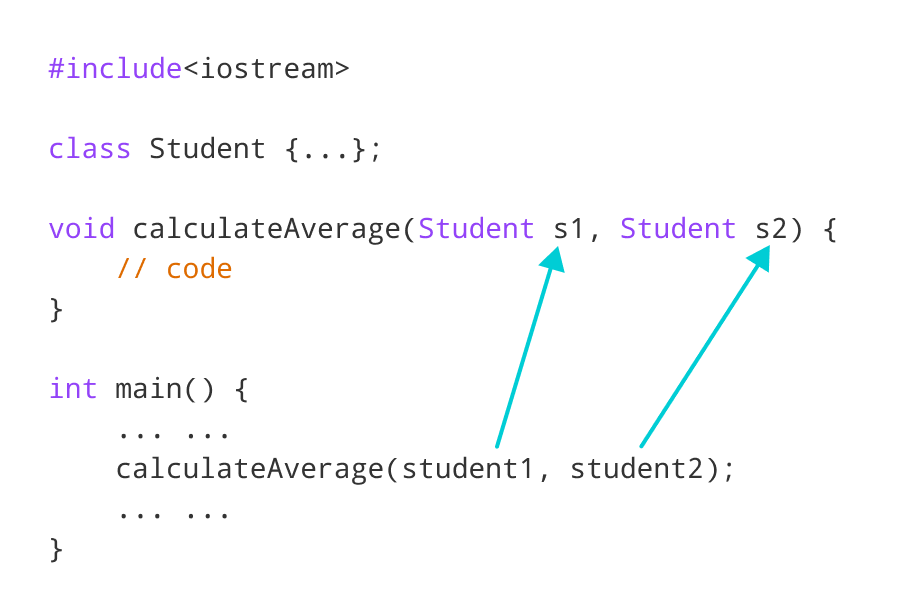
객체를 매개변수로 받는 함수
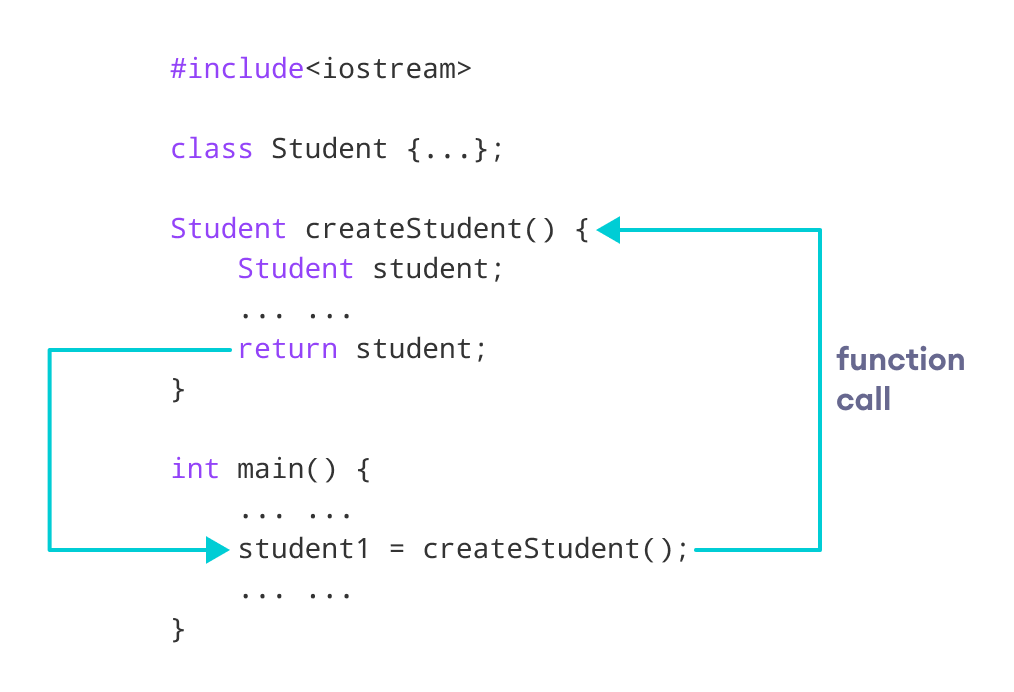
리턴형이 객체인 함수
연산자 오버로딩
1
2
3
4
5
6
7
8
9
10
11
12
13
class className {
    ... .. ...
    public
       returnType operator symbol (arguments) {
           ... .. ...
       }
    ... .. ...
};

/*
operator is a keyword.
symbol : +, <, -, ++, etc.
*/
1
2
3
4
5
6
7
8
9
10
11
12
13
14
15
16
17
18
19
20
21
22
23
24
25
26
27
28
29
30
31
32
33
34
35
36
37
38
39
40
41
42
43
44
45
46
47
48
49
50
51
52
53
54
// Overload ++ when used as prefix and postfix

#include <iostream>
using namespace std;

class Count {
   private:
    int value;

   public:
    // Constructor to initialize count to 5
    Count() : value(5) {}

    // Overload ++ when used as prefix
    Count operator ++ () {
        Count temp;

        // Here, value is the value attribute of the calling object
        temp.value = ++value;

        return temp;
    }

    // Overload ++ when used as postfix
    Count operator ++ (int) {
        Count temp;

        // Here, value is the value attribute of the calling object
        temp.value = value++;

        return temp;
    }

    void display() {
        cout << "Count: " << value << endl;
    }
};

int main() {
    Count count1, result;

    // Call the "Count operator ++ ()" function
    result = ++count1;
    result.display();

    // Call the "Count operator ++ (int)" function
    result = count1++;
    result.display();

    return 0;
}

Count: 6
Count: 6
this 포인터
1
2
3
4
5
6
7
8
9
class Test {
  private:
    int data;

  public :
    Test(int data) {
      this->data = data;
    }
}
상속
1
2
3
4
5
6
7
8
9
10
11
12
13
14
15
16
17
18
19
20
21
22
23
24
25
26
27
28
29
30
31
32
33
34
35
36
37
38
39
40
41
42
43
44
45
46
47
48
49
50
51
52
53
54
55
56
57
58
59
60
61
62
63
64
65
66
#include <iostream>
#include <string>
using namespace std;

// base class
class Animal {
   private:
    string color;

   protected:
    string type;

   public:
    void eat() {
        cout << "I can eat!" << endl;
    }

    void sleep() {
        cout << "I can sleep!" << endl;
    }

    void setColor(string clr) {
        color = clr;
    }

    string getColor() {
        return color;
    }
};

// derived class
class Dog : public Animal {
   public:
    void setType(string tp) {
        type = tp;
    }

    void displayInfo(string c) {
        cout << "I am a " << type << endl;
        cout << "My color is " << c << endl;
    }

    void bark() {
        cout << "I can bark! Woof woof!!" << endl;
    }
};

int main() {
    // Create object of the Dog class
    Dog dog1;

    // Calling members of the base class
    dog1.eat();
    dog1.sleep();
    dog1.setColor("black");

    // Calling member of the derived class
    dog1.bark();
    dog1.setType("mammal");

    // Using getColor() of dog1 as argument
    // getColor() returns string data
    dog1.displayInfo(dog1.getColor());

    return 0;
}
- Base class인 Animal에 멤버 변수를 봐야 함.
- color -> private, type -> protected
- protected, public은 derived class에서도 접근 가능함.
- 단, protected는 직접 접근하는 것은 불가능함.
private은 접근이 불가능함.
1
2
3
4
5
6
7
8
9
10
11
class Dog : public Animal {

    public:
      void setColor(string clr) {
          // Error: member "Animal::color" is inaccessible
          color = clr;
      }
};

// Error: member "Animal::type" is inaccessible
dog1.type = "mammal";

상속 받을 때, keyword에 따라 달라짐.
- public
- public, protected 그대로 가져옴.
- private
- public, protected -> private으로 바뀜,
- 기존 클래스의 private 멤버 변수는 접근 불가능.
- protected
- public, protected -> protected로 변경.
1
2
3
4
5
6
7
8
class Base {
    public:
        int x;
    protected:
        int y;
    private:
        int z;
};
1
2
3
4
5
class PublicDerived: public Base {
    // x is public
    // y is protected
    // z is not accessible from PublicDerived
};

1
2
3
4
5
class ProtectedDerived: protected Base {
    // x is protected
    // y is protected
    // z is not accessible from ProtectedDerived
};

1
2
3
4
5
class PrivateDerived: private Base {
    // x is private
    // y is private
    // z is not accessible from PrivateDerived
}

Function Overriding

1
2
3
4
5
6
7
8
9
10
11
12
13
14
15
16
17
18
19
20
21
22
23
24
25
26
27
28
29
30
31
32
// C++ program to access overridden function using pointer
// of Base type that points to an object of Derived class
#include <iostream>
using namespace std;
class Base {
public:
void print() {
cout << "Base Function" << endl;
}
};
class Derived : public Base {
public:
void print() {
cout << "Derived Function" << endl;
}
};
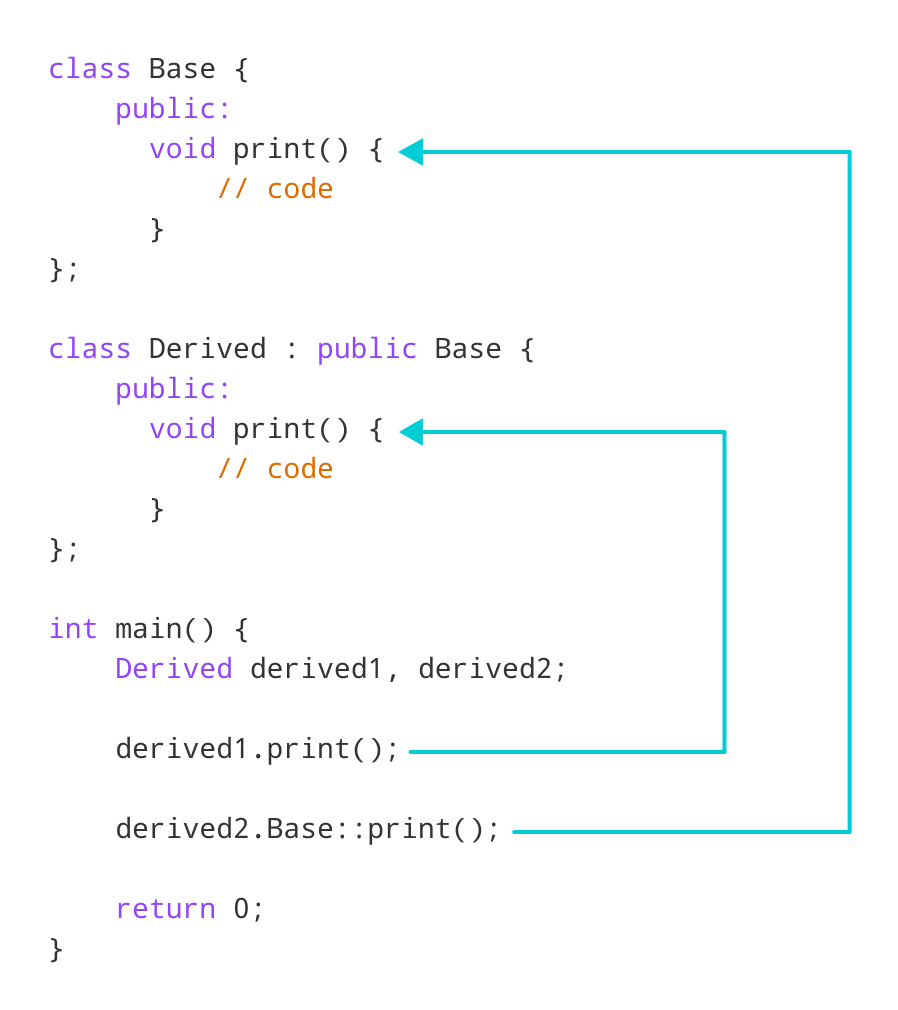
int main() {
Derived derived1;
// pointer of Base type that points to derived1
Base* ptr = &derived1;
// call function of Base class using ptr
ptr->print();
return 0;
}
// Output : Base Function
ptr이 derived1을 가리키고 있지만, ptr은 타입이 Base이므로 Base의 print 함수를 불러오는 것임.
Template
Function Template
1
2
3
4
5
6
7
8
9
10
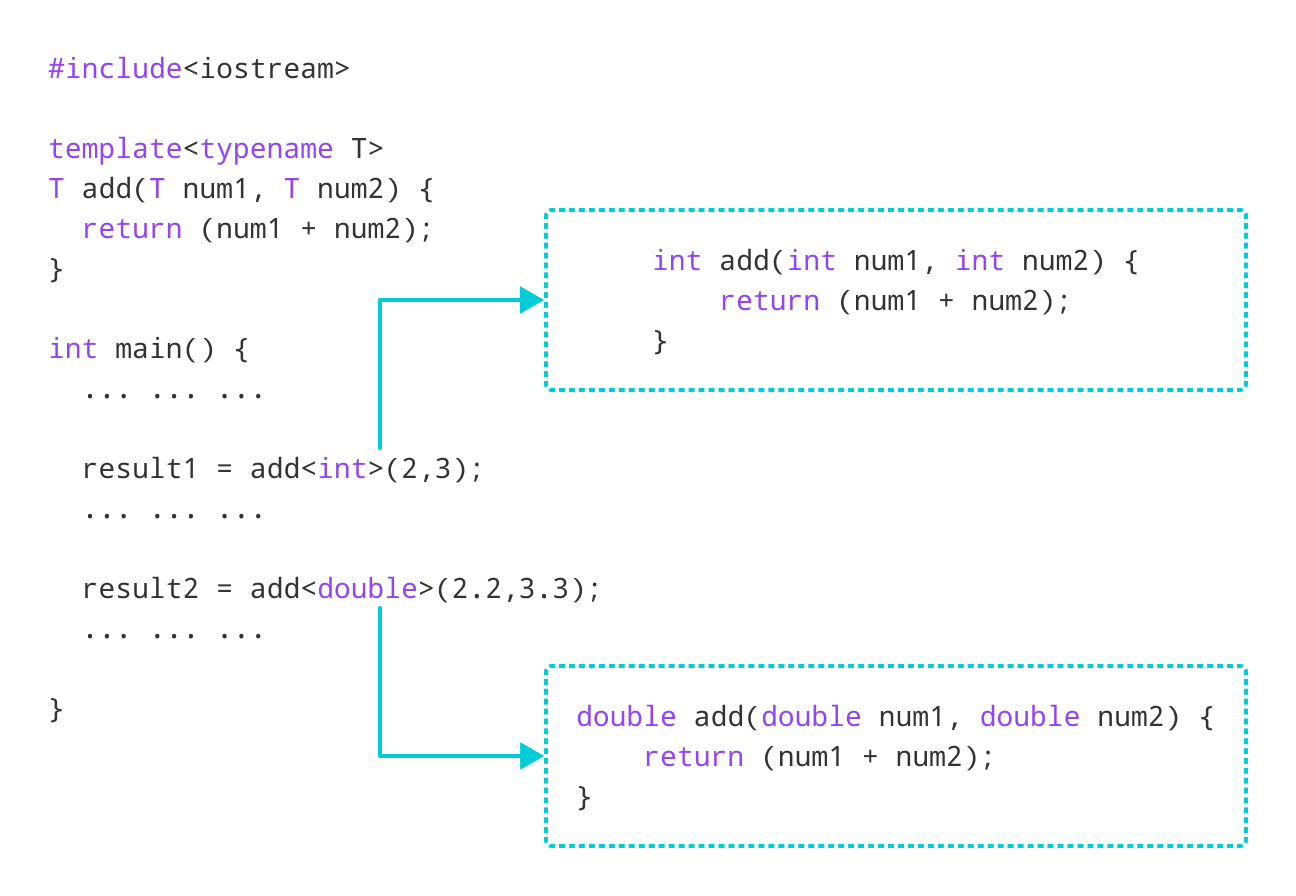
template <typename T>
T functionName(T parameter1, T parameter2, ...) {
// code
}
// example
template <typename T>
T add(T num1, T num2) {
return (num1 + num2);
}
1
2
3
4
typename : keyword
T : template argument that accepts different data types

Usage : functionName<dataType>(parameter1, parameter2,...);
Class Template
기본형은 다음과 같음.
1
2
3
4
5
6
7
8
9
template <class T>
class className {
  private:
    T var;
    ... .. ...
  public:
    T functionName(T arg);
    ... .. ...
};
- Usage
className<dataType> classObject;
1
2
3
4
5
6
7
8
9
10
11
12
13
14
15
16
17
18
19
20
21
22
23
24
25
26
27
28
29
30
// example
#include <iostream>
using namespace std;

template <class T>
class Number {
   private:
    T num;

   public:
    Number(T n) : num(n) {}   // constructor

    T getNum() {
        return num;
    }
};

int main() {
    Number<int> numberInt(7);
    Number<double> numberDouble(7.7);

    cout << "int Number = " << numberInt.getNum() << endl;
    cout << "double Number = " << numberDouble.getNum() << endl;
    return 0;
}

/*
int Number = 7
double Number = 7.7
*/
여러 개의 데이터형을 받는 방법은 아래와 같음.
1
2
3
4
5
6
7
8
9
10
template <class T, class U, class V = int>
class ClassName {
  private:
    T member1;
    U member2;
    V member3;
    ... .. ...
  public:
    ... .. ...
};
1
2
3
4
5
6
7
8
9
10
11
12
13
14
15
16
17
18
19
20
21
22
23
24
25
26
27
28
29
30
31
32
// example
#include <iostream>
using namespace std;

template <class T, class U, class V = char>
class ClassTemplate {
   private:
    T var1;
    U var2;
    V var3;

   public:
    ClassTemplate(T v1, U v2, V v3) : var1(v1), var2(v2), var3(v3) {}

    void printVar() {
        cout << "var1 = " << var1 << endl;
        cout << "var2 = " << var2 << endl;
        cout << "var3 = " << var3 << endl;
    }
};

int main() {
    ClassTemplate<int, double> obj1(7, 7.7, 'c');
    cout << "obj1 values: " << endl;
    obj1.printVar();

    ClassTemplate<double, char, bool> obj2(8.8, 'a', false);
    cout << "\nobj2 values: " << endl;
    obj2.printVar();

    return 0;
}